How to Store Emergency Water at Home for a Long Outage
Build a household water-storage system around usable quantities, full container weight, safe filling, accessible placement, and scheduled rotation.
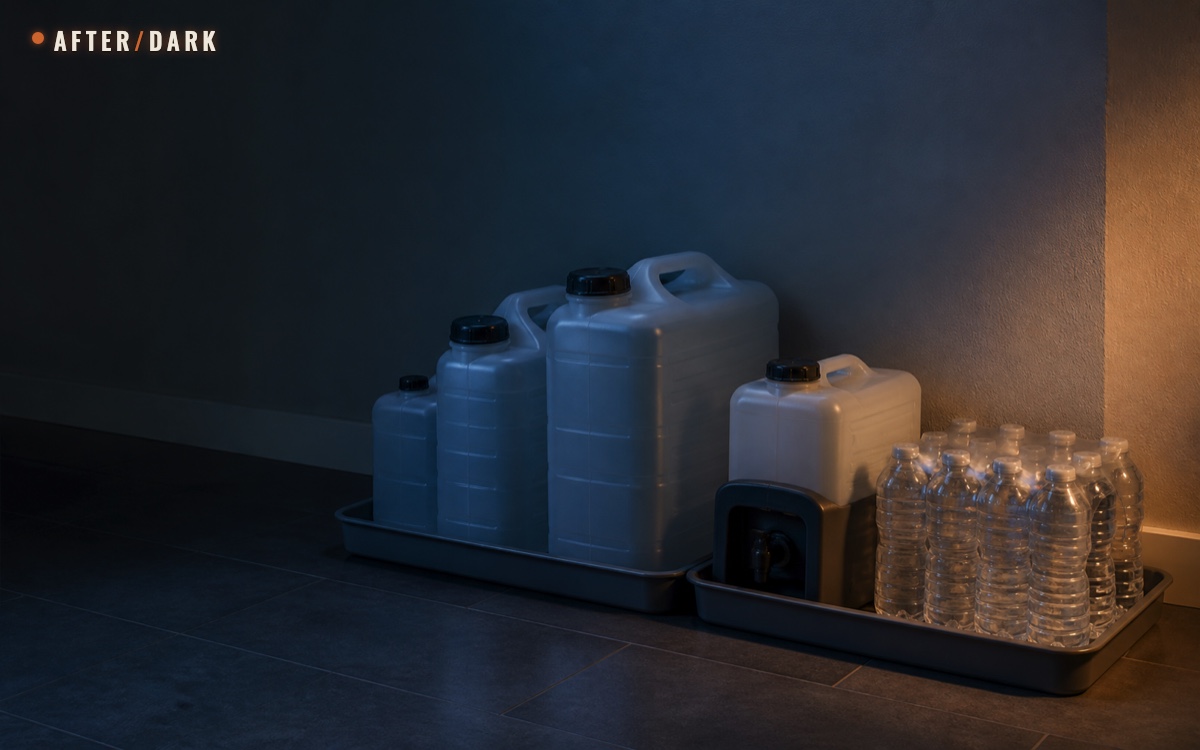
Short answer
Key takeaways
- Use the CDC baseline of at least one gallon per person per day for three days, then expand toward two weeks when the household can store and manage it.
- Calculate full weight before choosing locations: water alone weighs about 8.33 pounds per gallon, or one kilogram per liter.
- Choose food-grade containers with tight closures and openings that allow controlled pouring without hands or utensils entering the water.
- Split the reserve across usable container sizes and more than one appropriate location instead of creating one inaccessible point of failure.
- Label self-filled containers as drinking water with the fill date, replace the water every six months, and verify the system with a 24-hour no-tap test.
Store emergency water as a working household system, not as a number written on a shopping list. Begin with at least one gallon per person per day for three days, then expand toward two weeks when space and handling allow. Use unopened commercial water or fill clean, tightly closed food-grade containers only from a source that local authorities currently identify as safe for drinking. Split the total into sizes the household can move and pour, calculate full weight before choosing locations, label every self-filled container, and replace self-filled water every six months.
This guide owns the storage task: quantity, container roles, full-weight calculations, preparation, placement, dispensing, rotation, and a 24-hour test. Use the 30-day food and water guide to coordinate the reserve with a broader pantry, and count any water required by the long-outage cooking plan inside the household total rather than treating it as an invisible extra.
It does not explain how to treat an unsafe source, operate a well or cistern, repair plumbing, or respond to a specific disaster. If a current notice says the local supply may be unsafe, follow the issuing authority's instructions.
Calculate the Household Water Target
CDC recommends storing at least one gallon of water per person per day for three days and trying for a two-week supply when possible. That daily amount covers drinking, cooking, brushing teeth, and other limited uses. CDC also says some households should consider additional water for pets, hot climates, and particular household circumstances.
Use the official one-gallon daily figure as a baseline, not a promise that every household will use exactly that amount. Start with person-days:
baseline gallons = people × planned days × 1 gallon
For two people and seven days:
2 people × 7 days × 1 gallon = 14 gallons
The seven- and fourteen-day totals below are transparent extensions of the CDC daily baseline. They are planning calculations, not separate official recommendations.
Household baseline calculated from one gallon per person per day. Liter and weight figures are rounded.
| Household | 3-day baseline | 7-day calculation | 14-day calculation | Water-only weight at 14 days |
|---|---|---|---|---|
| 1 person | 3 gal / 11 L | 7 gal / 26 L | 14 gal / 53 L | about 117 lb / 53 kg |
| 2 people | 6 gal / 23 L | 14 gal / 53 L | 28 gal / 106 L | about 233 lb / 106 kg |
| 4 people | 12 gal / 45 L | 28 gal / 106 L | 56 gal / 212 L | about 466 lb / 212 kg |
Do not stop at the table. Write a household-specific target with four entries:
- number of people;
- baseline days currently stored;
- extra quantity planned for pets or other documented household needs;
- water already required by the actual no-cook and cooked menu.
If the complete target is too large for the available home, build it in stages. Complete three person-days first, test the storage, then add one or two person-days at a time. A verified partial reserve is more useful than an ambitious total that remains unfilled, inaccessible, or stored in unsuitable containers.
Calculate Full Container Weight Before Placement
Water is deceptively heavy because containers are usually selected and positioned while empty. The U.S. Geological Survey lists water at about 8.33 pounds per U.S. gallon, or one kilogram per liter. The final lifted and supported weight also includes the container, cap, spigot, and any crate.
Use this estimate before buying a rack or assigning a shelf:
estimated full weight = water volume × 8.33 lb + empty container weight
or, in metric units:
estimated full mass = water volume in liters × 1 kg + empty container mass
Approximate water weight before adding the container itself.
| Nominal volume | Water-only weight | Handling question to test |
|---|---|---|
| 1 gal / 3.8 L | about 8.3 lb / 3.8 kg | Can the intended user hold and pour it steadily? |
| 2.5 gal / 9.5 L | about 20.8 lb / 9.5 kg | Can it move from storage to the dispensing point? |
| 5 gal / 18.9 L | about 41.7 lb / 18.9 kg | Can it be used without lifting the full container? |
| 14 gal / 53 L total | about 117 lb / 53 kg | How will the total be divided across containers and locations? |
These are not universal container recommendations. They expose the decision. A five-gallon container may be manageable for one household and unusable for another. A small bottle is easy to handle but creates more packages, caps, and inventory lines. Select a mix only after testing the actual filled weight and dispensing method.
Never assign a full container to a surface based only on appearance. Follow the rated limits and setup instructions for the container, shelf, rack, or cabinet. Prefer stable, low placement that does not narrow a route, obstruct a door, or require someone to lift a heavy container down from overhead.
Divide the Reserve Into Three Usable Layers
A reserve should degrade gradually rather than fail all at once. Dividing it by function reduces dependence on one cap, one spigot, one storage location, or one person who can lift the largest container.
Container roles are an After/Dark planning framework; choose actual sizes only after a filled test.
| Layer | Job | Selection test | Storage priority |
|---|---|---|---|
| Service layer | Ordinary pouring during the first day | Can an authorized household member retrieve, open, and pour it cleanly? | Closest appropriate water location |
| Home reserve | Refill the service layer and extend the outage | Can it be dispensed without an unsafe lift or improvised transfer? | Cool, shaded, stable, and mapped |
| Portable layer | Supply an existing departure plan | Can it fit the tested load without replacing another necessary function? | Separate from the main reserve but recorded on the map |
The layers are functional, not product categories. Commercially bottled water may occupy the service layer, while self-filled containers form part of the home reserve. A smaller food-grade container may be refilled from a larger container through its intended spigot. The useful arrangement depends on how people can handle the equipment, not on making every container identical.
Keep the portable layer within the tested limits of the bug-out bag's real route and loaded walk. Do not count the same physical water twice—once in the home total and again in the departure total—without clearly recording that it transfers between plans.
Choose Containers That Protect the Water
CDC describes unopened commercially bottled water as the safest and most reliable emergency source. Follow the package's date information and storage directions. Commercial water can simplify the service layer, but package size, available space, waste, rotation, and handling still matter.
For water filled at home, CDC recommends FDA-approved food-grade storage containers. If the label is unclear, contact the manufacturer rather than guessing from the plastic's color or thickness.
CDC's safe-water storage guidance emphasizes durable containers with covered narrow openings that allow pouring without hands or objects entering the water. Use this container gate:
- Known purpose: marked or confirmed for food or drinking-water contact.
- Tight closure: the cap or lid closes fully and remains protected in storage.
- Durable body: no cracks, deep scratches, stressed seams, or brittle areas.
- Controlled opening: a narrow neck, covered opening, or intended spigot permits pouring without hands entering the water.
- Usable handle: the filled container can be moved as planned, or the system dispenses it without lifting.
- Stable shape: it sits securely in the intended orientation and is stacked only when the manufacturer permits it.
- Maintainable design: the household can reach the surfaces that the manufacturer and CDC instructions require it to clean.
CDC says not to use a container that previously held toxic chemicals. Do not attempt to convert unknown containers into drinking-water storage. A tight cap does not correct an unsuitable material or previous contents.
Prepare and Fill Self-Filled Containers
Fill containers only with water currently known to be safe. If the source is subject to a current advisory or its safety is uncertain, stop and follow local instructions. The steps below prepare the container; they are not a method for treating unsafe source water.
For a reusable food-grade container, follow its manufacturer's directions first. CDC's current preparation process can be turned into this fill card:
- Wash the container with soap and rinse it completely with water.
- Make a sanitizing solution using one teaspoon of unscented household chlorine bleach containing 5%–9% sodium hypochlorite in one quart, or four cups, of water.
- Close the container and shake it so the solution contacts every internal surface.
- Wait at least 30 seconds, empty the solution, and let the container air-dry.
- Fill it with clean water and close the lid tightly without touching the inside of the cap or opening.
Use the measurements and concentration specified by the source; do not improvise a stronger mixture. Keep the cleaning product in its original labeled package and separate from stored drinking water. If the container instructions conflict with the intended use or cannot be followed, choose another container.
Fill, close, wipe, inspect, and label one container before moving to the next. This prevents a row of identical containers from losing their dates or status during the task.
Use One Label and One Inventory Record
CDC says to label a self-filled container as drinking water and include the storage date. Extend that minimum into a short operational label:
DRINKING WATER / 5 GAL / FILLED 2026-08-13 / REPLACE 2027-02 / WATER-A2
Use the actual volume and date. WATER-A2 is a location code, not a claim about the contents. Keep the label concise enough to read in poor light and place it where it remains visible in the intended orientation.
The household inventory should record the same operational fields for every container.
Minimum inventory fields for a mapped household water reserve.
| Field | Example | Purpose |
|---|---|---|
| Container ID | WATER-03 | Distinguishes similar containers |
| Type and capacity | Food-grade container, 5 gal | Supports volume and handling calculations |
| Current location | UTILITY-LOW-A2 | Makes retrieval possible without searching |
| Fill or package date | 2026-08-13 | Starts the maintenance clock |
| Replace or review date | 2027-02 | Creates an action rather than a vague reminder |
| Condition | Sealed; no leak or damage | Records the last inspection |
| Assigned layer | Home reserve | Prevents double-counting elsewhere |
Add the location codes to the one-page home supply map. Keep the inventory near the household plan, not taped only to the containers it is supposed to help locate.
Choose Storage Locations That Preserve the Water and the Home
CDC advises keeping stored water cool, out of direct sunlight, and away from toxic substances such as gasoline or pesticides. Its emergency-supply page gives a preferred cool range of 50°F–70°F, or 10°C–21°C, for self-filled containers.
Evaluate each proposed location against five conditions:
- Environment: reasonably cool, shaded, and not subject to freezing or routine high heat.
- Separation: away from toxic substances and strong contamination risks.
- Support: within the rated limits of the surface, rack, or container stack.
- Leak consequence: not above documents, electronics, dry food, or another item a leak would disable.
- Access: reachable without moving several unrelated boxes or blocking an exit route.
Do not interpret “out of sight” as “properly stored.” The back of a crowded upper cabinet may be cool and dark but fail the weight and access tests. A sunlit balcony may offer space but fail the temperature and sunlight tests. A utility area may have a strong floor but fail the separation test.
Use more than one appropriate location when possible. Distribution protects access if one area is blocked or one container leaks. It also makes the weight visible as a home-layout decision rather than concentrating the entire reserve on one shelf.
Integrate the final locations with the home-base zones and clear-route audit. Water belongs near the living system, but never at the cost of a usable door, hallway, stair, or access panel.
Apartment placement
In a small apartment, prioritize low unused footprints rather than tall stacks: the bottom of an approved pantry rack, a floor-level utility shelf away from chemicals, or another cool interior location allowed by the property. Split the total so one leak cannot affect every container or the apartment below. Confirm that the selected rack and flooring arrangement can support the filled load; ask the property owner or an appropriate professional when the location is uncertain.
House placement
A house may offer more storage rooms, but more space can hide a poorly mapped reserve. Avoid dividing containers among so many places that nobody knows the total. Choose a small number of suitable zones, give each a code, and keep one current inventory.
Garages, sheds, attics, vehicles, and exterior storage can experience temperature extremes or hold incompatible substances. Do not assume they qualify simply because they have open floor space.
Make the Reserve Usable Without a Tap
A sealed supply can still fail at the moment of use. A cap may require a missing tool, a spigot may need clearance from the floor, or the only clean receiving container may be elsewhere.
CDC recommends removing water without touching it or the inside of the container and using a clean scoop every time if a scoop is necessary. Direct pouring or an intended covered dispenser reduces the number of objects entering the water.
Test each container type while filled with ordinary safe water:
- retrieve it from the real storage position;
- check that the label is readable and the closure is intact;
- open it with the tool that will actually be available;
- pour or dispense one measured amount without touching the opening;
- close it correctly and inspect for drips;
- return it without blocking the route or lifting beyond the user's tested ability.
If a large container needs a spigot or pump, use only a compatible device intended by the manufacturer and store it clean, protected, and attached or immediately adjacent. Do not plan to improvise a transfer method during an outage.
Keep one clean service container for measured daily access if the reserve containers are too large for repeated pouring. Label its purpose, protect its opening, and clean it according to the applicable instructions. It does not add water to the inventory; it only changes how water is dispensed.
Use a full dishwashing cycle without running water as one practical dispensing test. Record basin fills, replacements, and equipment cleanup against the same reserve so kitchen washing has a measured allocation.
Run a 24-Hour No-Tap Test
The calculation proves how much water is present. A test reveals whether the household can use it.
Choose an ordinary day and mark the household taps off-limits for 24 hours without shutting building valves or altering plumbing. Use only known-safe stored water for the planned categories. Keep normal water service available in case the test must stop, and continue following all current local instructions.
Record each withdrawal:
A test log measures the storage plan; it does not create a new universal daily allowance.
| Time | Container ID | Amount | Use category | Problem observed |
|---|---|---|---|---|
| 07:00 | WATER-01 | 0.5 gal | Morning drinking and food preparation | Container pours cleanly |
| 12:30 | WATER-02 | 0.25 gal | Lunch preparation | Cap tool was not beside container |
| 18:00 | WATER-02 | 0.75 gal | Dinner and limited cleanup | Dispensing position too low |
At the end, compare the observed total with the one-gallon-per-person planning baseline. A one-day result may be higher or lower; it is evidence about that household, menu, weather, and routine, not permission to reduce the official minimum.
Correct every physical failure:
- move the cap tool to the container;
- raise an intended dispenser only on a stable, rated surface;
- replace a container that cannot be controlled when full;
- add water when the actual planned menu consumes more than the calculation included;
- change a location that requires unrelated boxes to be moved;
- revise the inventory when a container ID or layer was unclear.
Repeat the retrieval and pouring portion whenever the container type, location, household access needs, or dispensing equipment changes.
Rotate and Inspect the Water
CDC says to replace water filled into household containers every six months. For commercial water, observe the date and storage information on the package. Use one calendar reminder for the system, then record each completed container action.
Every month, conduct a short external inspection without unnecessarily opening sealed water:
- compare the physical count with the inventory;
- look for leaks, bulging, cracks, brittle areas, damaged closures, or faded labels;
- confirm containers remain upright and correctly supported;
- verify sunlight, heat, nearby substances, and stored objects have not changed the location;
- ensure the route and dispensing equipment remain accessible.
Every six months:
- replace self-filled water using the current CDC and container instructions;
- clean and sanitize reusable containers before refilling;
- rotate commercial packages according to their dates and condition;
- update fill dates, replacement dates, and inventory quantities;
- repeat the handling and dispensing test;
- correct the household total if people, pets, menu, locations, or planned days changed.
Do not quietly extend a date because the water “looks fine.” Appearance is not the maintenance rule. Follow current official guidance and product information.
Fix the Common Water-Storage Failures
The total exists only on paper
The inventory claims 28 gallons, but empty containers and planned purchases are counted as stored water. Record only filled, sealed, inspected containers that are in their assigned locations.
Every container is too heavy for ordinary use
The household reached the volume target with large containers but cannot control them when full. Add a tested service layer and choose container sizes based on filled handling, not maximum capacity.
The reserve has one point of failure
All water shares one container, closure, shelf, or room. Distribute the reserve across more than one appropriate container and location while keeping one inventory.
The container history is unknown
A convenient container has no food-grade marking and nobody knows what it held. Do not use it for drinking water. Replace uncertainty with a purpose-made or manufacturer-confirmed option.
Water is stored beside incompatible products
The location is cool and dark but shares space with toxic or strongly contaminating substances. Move the water to a suitable separated location.
The labels do not trigger action
“Emergency water” identifies the category but not the fill date, next replacement, capacity, or location code. Use one label format that turns every inspection into a clear decision.
The household never tested dispensing
The first real opening reveals a missing cap tool, no spigot clearance, or an uncontrollable pour. Test filled containers before relying on them.
Zombie Scenario: The Container Nobody Could Move
Fictional scenario
On the fourth evening of a fictional zombie outbreak, running water stops in the apartment building. The household inventory shows fourteen gallons, but the reserve is not one fourteen-gallon object. Two service containers sit in a mapped low cabinet, and the remaining water is divided between two cool interior locations. Every container has a fill date, replacement month, capacity, and location code.
One person retrieves the service layer while another checks the paper inventory. The intended dispenser is stored beside the larger reserve container, so nobody needs to lift its full weight or search for an improvised transfer tool. The household starts a use log and follows the quantities and menu already tested during the 24-hour exercise.
The fictional disruption did not make the water system work. The earlier calculation, container choices, labels, placement, and filled test did.
Complete the Water-Storage System
The finished system should answer these questions without opening every container:
- How many person-days are physically stored now?
- Which totals are official baselines and which are household calculations?
- What does every filled container weigh?
- Can the intended user retrieve and dispense each container safely?
- Is every container food-grade, tightly closed, dated, and mapped?
- Are the locations cool, shaded, separated, supported, and accessible?
- When will self-filled water be replaced?
- Did the household complete a 24-hour no-tap test and correct the failures?
When those answers are current, the reserve is no longer a pile of water packages. It is a household system that can be counted, reached, used, and maintained through a long outage.
Frequently Asked
How much emergency water should a household store?
How often should self-filled emergency water be replaced?
Can the whole reserve go into one large container?
Can tap water be stored for an emergency?
Sources
Related guides
How to Build a 30-Day Food and Water Supply for an Apocalypse
A practical 30-day pantry for apocalypse preparedness, built from person-days, package labels, a no-cook layer, and stored water you can rotate.
How to Organize and Store Emergency Supplies at Home
Turn scattered emergency supplies into a mapped, labeled home system that stays accessible, countable, and separate from your departure kit.
How to Prepare Your Home for an Apocalypse
Turn an ordinary house or apartment into a safe, workable base without blocking exits, scattering supplies, or mistaking barricades for preparedness.