How to Find and Collect Fresh Water in the Wild
Read the landscape, assess natural sources, and collect water with what you can carry, from woodland streams to a rain-catching sheet.
Short answer
Key takeaways
- Use terrain and map symbols to identify candidates, then establish whether water is actually present and reachable.
- Forest streams, desert springs, and rock pools have different seasonal and access constraints.
- Rain collection needs a suitable surface, a continuous downhill path, and enough container capacity.
- Judge a small source by water actually collected, not by the size of the wet patch around it.
- Experimental dew collectors and solar stills do not establish a guaranteed field yield.
- Keep collected water separate from drinking water until appropriate assessment and treatment are complete.
Finding water in the wild starts with the landscape and the water that is actually available. In woodland, that may mean locating a stream crossing or a spring on a hillside. In dry country, it may mean checking a known source that changes with the season. During rain, a portable collection surface can gather water where you are.
The task is to turn a possible source into water you can collect and carry. This matters on an extended journey, during an evacuation, or at a temporary stop where familiar supplies are unavailable. You may have only a bottle and a pot; a method that assumes a tank, plumbing, or a complete campsite will not answer every situation.
Keep one distinction clear throughout: finding fresh water and making drinking water are separate tasks. Natural water can look clean and still require treatment. The National Park Service's collection guidance makes that distinction explicit. This article covers finding and collecting; it does not assume the contents of a newly filled bottle are ready to drink.
Start with Your Position and the Equipment You Have
Identify your location well enough to relate nearby features to a map. Look for an actual access point: where a path crosses a stream, where a spring is marked, or where the shore of a lake can be reached. A straight-line distance says little about a steep bank or a missing crossing.
Use your offline maps and paper navigation pack to keep the search connected to a known route. If the map is unavailable, work from identifiable surroundings and observations; do not invent a precise location from a guess about where water should be.
If you are lost, source-finding advice is not a reason to start wandering. Contact the relevant emergency service when help is needed and follow its instructions. The NPS outdoor emergency plan specifically advises staying put when waiting for rescuers. The collection methods below do not replace that guidance.
Next, identify what can hold water. A narrow bottle works differently from a wide pot, scoop, or collapsible bucket. Check the opening, closure, capacity, and whether the vessel can be used with your treatment equipment. A sheet can enlarge a rain catchment, but it cannot replace the receiving container.
Use current ranger or land-manager information when available, including anything saved before losing connectivity. Note when a report was made. A report that a spring flowed last season is a useful lead, with a different level of certainty from water you can see flowing now.
Find Water in Forests and Wetter Terrain
Read the water features on the map
Look for mapped streams, lakes, springs, and their relationship to paths and contour lines. Read that map's legend before interpreting the symbols. On US Topo maps, for example, USGS distinguishes a perennial stream with a solid blue line from an intermittent stream with a dashed-and-dotted blue line. Other maps may use different conventions. USGS map-symbol guide.
A map identifies a place to investigate; it does not supply a live flow report. Match the mapped feature to something observable: a stream channel at the crossing, a spring outlet, or the actual lake shore. Keep the season and recent conditions attached to that observation.
Separate three questions: Where is the feature? Is water present? Can I collect it from here? Answering the first question does not settle the other two. This prevents a blue line from becoming an assumed refill in the middle of a long walk.
Look for emerging water at slopes and valley margins
Water can emerge where groundwater meets the ground surface, including hillsides and valley bottoms. USGS describes springs ranging from occasional seeps to continuous flows. This gives you features to examine along a reachable route: a distinct trickle from a bank, water issuing from a rock opening, or a small channel beginning on a slope. USGS explanation of springs.
Observe the water itself. Is it moving from an identifiable outlet? Is there a place to position a vessel? Does the container fill, or are you looking at a damp surface with no collectable flow? Inspect from existing access rather than excavating the bank or dismantling the outlet.
When several clues coincide, keep their roles separate. The map supplies a location, the terrain helps explain it, and an observed flow establishes present availability. Clear-looking water still does not establish drinking-water quality.
Use a stream or lake through a reachable collection point
Once water is visible, choose where the collection can actually happen. A shallow margin reachable from firm ground may work with a scoop when a narrow bottle cannot be submerged. A lake may require a different approach from a moving stream. The collection vessel should fit the access you have, rather than forcing you farther into the water.
NPS recommends collection away from established campsites and grazing areas, using moving water in streams and water just below the surface in lakes. Its guidance still requires treatment. These are source-selection considerations, not a guarantee that an upstream or moving source is safe. NPS natural-water collection steps.
Look at the collection point and the route leading to it before opening the bottle. If it requires wading, an unstable descent, or reaching beyond secure footing, use another accessible point. Keep the same access usable for the return with a filled vessel.
Find Water in Dry Country Without Assuming It Is Everywhere
Desert water is strongly tied to particular places and conditions. The useful question is which source is supported by local information and present evidence. A generic instruction to head downhill cannot establish that a dry valley contains accessible water.
The NPS Sonoran Desert monitoring program distinguishes springs, seeps, and tinajas, natural water-holding depressions in bedrock. A seep may not bring water all the way to the surface; rock pools may receive spring flow or precipitation. These are real regional source types, with different collection possibilities. NPS desert-source descriptions.
Vegetation can add context. USGS notes that, in some arid regions, cottonwoods and willows may indicate groundwater at shallow to moderate depth. It also cautions that visible groundwater does not necessarily occur in usable quantities or quality. That is evidence for investigating a location, not proof that a bottle can be filled beneath a particular tree. USGS groundwater-location guidance.
Check a named source against the season
Use exact source names and the latest available observations. In Zion, for example, NPS lists some springs with usual year-round flow and others that commonly dry by early summer. The example demonstrates why two nearby spring symbols can represent very different prospects; it is not a forecast for another desert. NPS Zion water-source information.
At the location, distinguish a flowing outlet from wet ground and an isolated pool from a replenishing source. Look for an accessible edge or outlet where the receiving vessel can stay upright. A water-filled hollow that cannot be reached without climbing into it is not equivalent to a usable spring beside the trail.
A dry wash records a path that water can take. Finding that channel does not establish present flow, fresh water beneath it, or a practical depth for digging. USGS explains that determining groundwater depth, quantity, and quality requires investigation of local hydrology and geology. There is no universal digging depth this guide can honestly give you. USGS groundwater-location guidance.
Give small sources a realistic collection time
A trickle may be collectable without being fast. Use a small receiving vessel if it fits beneath the existing flow, then transfer into the carrying container. Avoid obstructing or altering the source to make your bottle fit.
Measure a sample when doing so is practical. If a hypothetical outlet fills 250 milliliters in two minutes, the observed rate is 125 milliliters per minute. At that unchanged rate, collecting two liters takes 16 minutes, before transfers. This is an arithmetic example, not an expected spring yield.
The distinction matters when comparing options. A reachable slow outlet may be workable with a pot, while a broad wet patch gives you no measured collection rate at all. Count what enters the vessel, and reassess if the flow changes.
Some locations have no usable natural supply. A complete account of dry-country water must leave room for that result. If an assumed source is dry or unsuitable, remove it from the available-water calculation rather than replacing observation with a more elaborate theory about hidden water.
Collect Rain with a Portable Surface and Container
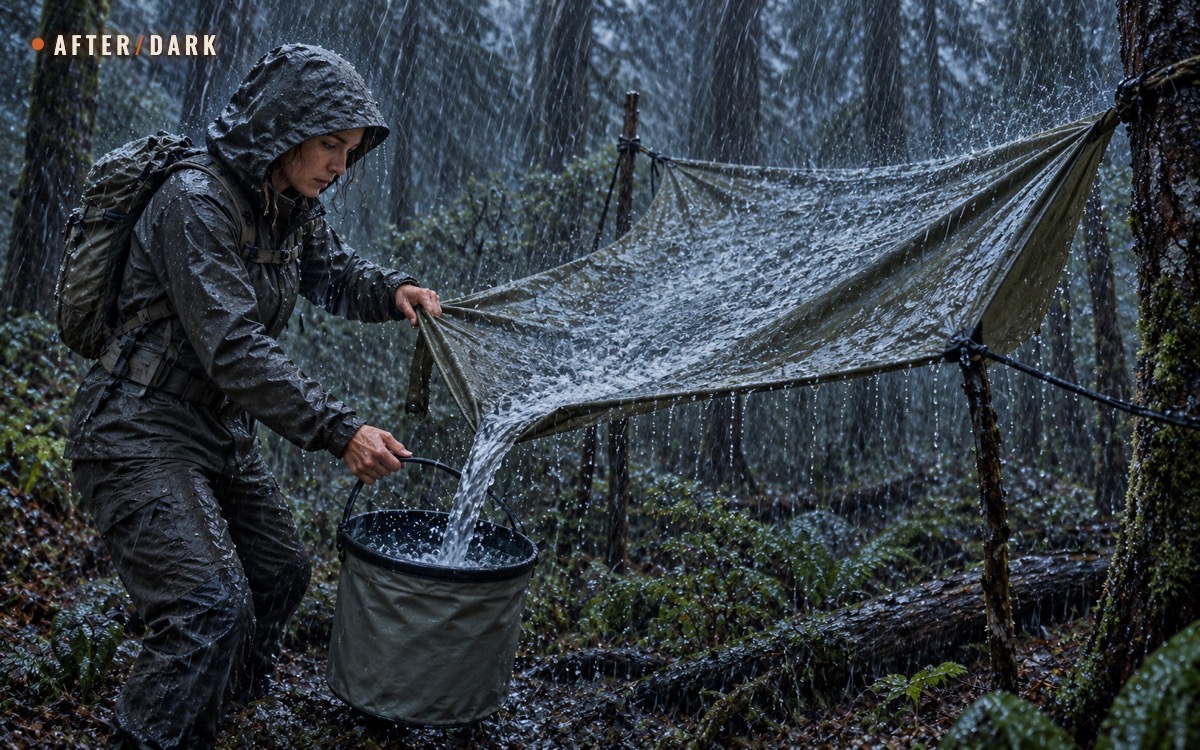
Rain provides a collection opportunity without finding a stream. The basic arrangement is a raised surface sloping toward a receiving vessel. The Emergency WASH Compendium describes tarpaulin catchments among temporary raised-surface systems. You can apply that collection principle at a small scale without installing a domestic tank.
Choose the material deliberately. Waterproof does not establish suitability for collecting water intended for drinking after treatment. Check the manufacturer's intended use and the surface's previous use; exclude unknown chemical residues or unsuitable coatings. CDC explains that contamination can enter from the air and the surfaces water touches. CDC rainwater guidance.
Arrange a continuous path into the vessel
With a suitable sheet and receiving container available:
- Raise the collecting face. Use suitable supports and attachment points, keeping the working area reachable and above the ground.
- Expose it to rain. Account for any portion obscured by overhead cover.
- Create a steady slope to one exit. Secure the higher edges; remove folds that trap water or divert it sideways.
- Align the receiver. Keep the outlet above its opening and clear of mud.
- Watch the first flow. Correct leaks, debris, and water missing the vessel.
- Transfer before overflow. Use suitable closed containers and keep the batch identified as untreated.
These are editorial setup checks for a small collector, not specifications for a load-bearing structure. Use the sheet's attachment instructions, keep the setup low and inspectable, and do not compromise the shelter you need to make a larger catchment.
If the collecting surface needs cleaning or initial runoff diversion, follow the equipment's instructions. There is no universal number of seconds after which rain washing over a dirty sheet becomes drinkable. Collection and treatment remain separate.
With only a pot or wide container, place it where rain can fall into the opening without picking up ground runoff. The method is simpler but the opening limits the collection area. With a bottle, check whether its narrow neck is the main limitation before spending time trying to keep it perfectly upright in a shower.
Estimate the volume without promising the weather
One millimeter of rain over one square meter represents one liter before losses. This follows from volume: 0.001 meters × 1 square meter = 0.001 cubic meters. Use the collector's horizontal footprint exposed to rain, not the total area of fabric folded or hanging vertically.
Theoretical liters = horizontal collection area in m² × rainfall in mm.
Real collection also depends on losses and available receiving capacity. The WASH Compendium includes collection efficiency and storage volume among the design variables. For a portable setup, observe what actually reaches the container rather than borrowing a roof-system efficiency as a guaranteed result. Rainwater design considerations.
Illustrative results from 5 mm of rain; all areas and losses below are hypothetical.
| Collection arrangement | Calculation | Water before the stated limit |
|---|---|---|
| Sheet with a 2 m² exposed horizontal footprint | 2 × 5 | 10 L before losses |
| Same sheet, assuming 70% reaches the receiver | 10 × 0.7 | 7 L potentially delivered |
| Same event, one empty 3 L receiver and no transfers | Smaller of 7 L and 3 L | 3 L retained |
| Open vessel with a 0.04 m² mouth | 0.04 × 5 | 0.2 L before losses |
The 70 percent figure is an invented recovery assumption, not a tested rating. The comparison shows why a collection surface and timely container changes matter. It does not establish how long a particular shower will last or how much rain will fall.
A rain forecast belongs in an estimate. Water already in the vessel belongs in the collected total. If rain stops early, use the amount caught; a larger sheet cannot recover rainfall that never arrived.
Compare the Sources in Front of You
Use the comparison below after identifying real candidates. It compares collection mechanics, not drinking-water safety. Current advisories and the ability to assess and treat the source still determine whether it can become drinking water.
Match an observed source to the collection task and the limitation you need to resolve.
| Source or method | What makes collection possible | Main uncertainty or constraint |
|---|---|---|
| Flowing stream | Reachable water and a vessel that fits the fill point | Current contamination information and access |
| Lake | An accessible shore and a way to collect below the surface | Water quality and ability to fill without entering the water |
| Spring outlet | Water visibly emerging at a reachable point | Seasonal flow, water quality, and filling time |
| Seep or wet patch | Enough emerging water to enter a vessel | Damp ground may provide no collectable flow |
| Desert rock pool | Water present in a reachable bedrock hollow | Seasonal availability, water quality, and access restrictions |
| Rain collection | Rain, suitable catchment material, and receiving capacity | Weather, capture losses, and container changes |
| Dew collection | Suitable condensation conditions and collection surface | Site-specific yield and whether enough can be recovered |
Compare complete actions rather than attractive source names. An accessible outlet and a vessel that fits can be more useful than a large body of water behind an impassable bank. A rain collector already working at a temporary stop may add water while a mapped source remains unverified.
Understand the Limits of Dew, Condensation, and Plant Clues
Dew is a conditional supplement
Dew collection is a real subject of field research. A Wageningen study compared specially designed passive collectors, including an insulated inclined surface and an inverted-pyramid collector; their performance differed. That evidence concerns particular collectors in a Dutch grassland, not an assured bottle of water from any sheet left outside. Jacobs, Heusinkveld and Berkowicz, 2008.
For this guide, treat a dew setup as an optional, measured supplement. Condensation on a surface does not tell you how much can be transferred into a vessel. Establish the actual collected amount and the material's suitability before assigning it a supply role. Wiping unknown vegetation or a previously used groundsheet adds contact surfaces whose suitability is unverified.
A solar still needs a source of moisture
A solar still uses heat to evaporate existing water or moisture and a cooler surface to collect the condensate. USGS describes that mechanism in its desalination explanation. It is a distillation process with input material, suitable equipment, and time requirements; it does not create water from dry ground. USGS distillation overview.
This article assigns no promised daily yield to an improvised pit or sheet arrangement. That would require evidence about the particular moisture source, apparatus, and conditions. Construction and treatment performance belong to a separate distillation task.
A water-storing plant is not a canteen
Do not translate a plant's ability to survive drought into a claim that its contents are drinking water. For example, NPS describes the fishhook barrel cactus's interior as alkaline juice and rejects the familiar claim that it is a good water source. NPS barrel-cactus description.
Keep plant observations in their proper role: clues to the surrounding environment when supported by local knowledge. They do not replace locating and assessing an actual collectable source.
Collect, Transfer, and Carry Water Without Losing Track of Its Status
Prepare the receiving and carrying vessels before starting. CDC recommends containers that protect water from recontamination and excludes those previously used for toxic chemicals. Use a wide collection vessel when the source demands it, then a suitable closed container for transport. CDC container guidance.
A small scoop or pot can solve an awkward filling problem. A narrow-neck bottle may not fit under a shallow trickle, while an open vessel can receive the flow and then pour through a suitable funnel. Arrange the transfer before filling so you have somewhere stable to put both vessels.
At a natural source, use this short sequence alongside the NPS collection guidance:
- Prepare the fill point. Confirm access and keep the vessel opening and cap interior off the ground.
- Collect and transfer. Fill just below the surface without disturbing sediment; pour steadily into the carrying container.
- Close and distinguish the batch. Identify it as untreated and keep it separate from drinking water.
- Check the carry. Secure closures and confirm that the filled load can be moved over the return route.
Keep collection equipment accessible in your portable supply kit. A scoop buried beneath every other item is awkward when the only workable fill point leaves little room to unpack. A container that collapses when empty may save space, but its full shape and closure still need to work during transport.
Avoid topping up treated water with a new untreated batch. CDC specifically warns that mixing collected rainwater into previously treated water can contaminate it. Keep the batches separate until the required processing is complete. CDC mixing precaution.
Establish the Drinking-Water Handoff
Before drinking, check what the source requires and what your available process can accomplish. Follow current local water advisories and authoritative treatment instructions. CDC states that boiling or disinfecting cannot make water containing fuel or toxic chemicals safe; such a source requires an alternative. CDC treatment limits and instructions.
A regional warning can override general source-selection advice. Zion's current guidance, for example, restricts use of certain stream water because ordinary recreational treatment does not remove the identified cyanotoxins. An attractive stream and an available filter do not cancel that warning. NPS Zion water advisories.
Once water has been appropriately prepared, protect it during carrying and dispensing. If the journey ends at a longer-term base, the water-storage guide covers that next stage. The field task ends with a known amount collected, a clear water-quality status, and a feasible next step before drinking.
Zombie Scenario: The Downpour Between Water Sources
Fictional scenario
During a fictional zombie outbreak, two travelers reach a woodland stop along their planned route. Their map marks a spring farther ahead, but the saved report is old. They still have carried drinking water; they do not count the unvisited spring as a refill.
Heavy rain begins. One traveler stretches their suitable collection sheet into a sloping catchment while the other positions a collapsible bucket beneath its low corner. They adjust a fold that was spilling water sideways and change receivers before either overflows.
When the rain eases, they measure the catch and keep it separate from their drinking bottles until treatment is complete. The useful result is water actually collected with portable equipment. The spring remains a candidate to verify when conditions allow the journey to continue.
Frequently Asked
Can I collect rain with only a bottle?
Does a filter make every natural source usable?
What if I have no container?
Sources
- USGS — US Topo Map Symbol Guide
- USGS — Springs and the Water Cycle
- USGS — How Do Hydrologists Locate Groundwater?
- National Park Service — Springs, Seeps, and Tinajas
- National Park Service — Water Sources in Zion
- Emergency WASH Compendium — Rainwater Harvesting: Raised Surface Collection
- CDC — Collecting Rainwater and Your Health: An Overview
- National Park Service — Two Ways to Purify Water
- Jacobs, Heusinkveld and Berkowicz — Passive Dew Collection in a Grassland Area
- USGS — Desalination
- National Park Service — Tonto Cacti and Desert Succulents
- CDC — How to Make Water Safe in an Emergency
- CDC — Safe Water Storage
- National Park Service — Outdoor Emergency Plan
Related guides
How to Prepare Offline Maps for an Emergency Evacuation
Build a three-layer navigation pack that keeps household routes, destinations, and decision points usable when mobile data is unavailable.
How to Build an Apocalypse Bug-Out Bag
Build a portable evacuation kit around a real destination, route, household, and loaded walk test—not a generic pile of emergency gear.
How to Store Emergency Water at Home for a Long Outage
Build a household water-storage system around usable quantities, full container weight, safe filling, accessible placement, and scheduled rotation.