How to Keep Food Cold During a Long Power Outage
Build a measured cold-storage plan for the refrigerator, freezer, and coolers, with transfer triggers and official food-safety limits.
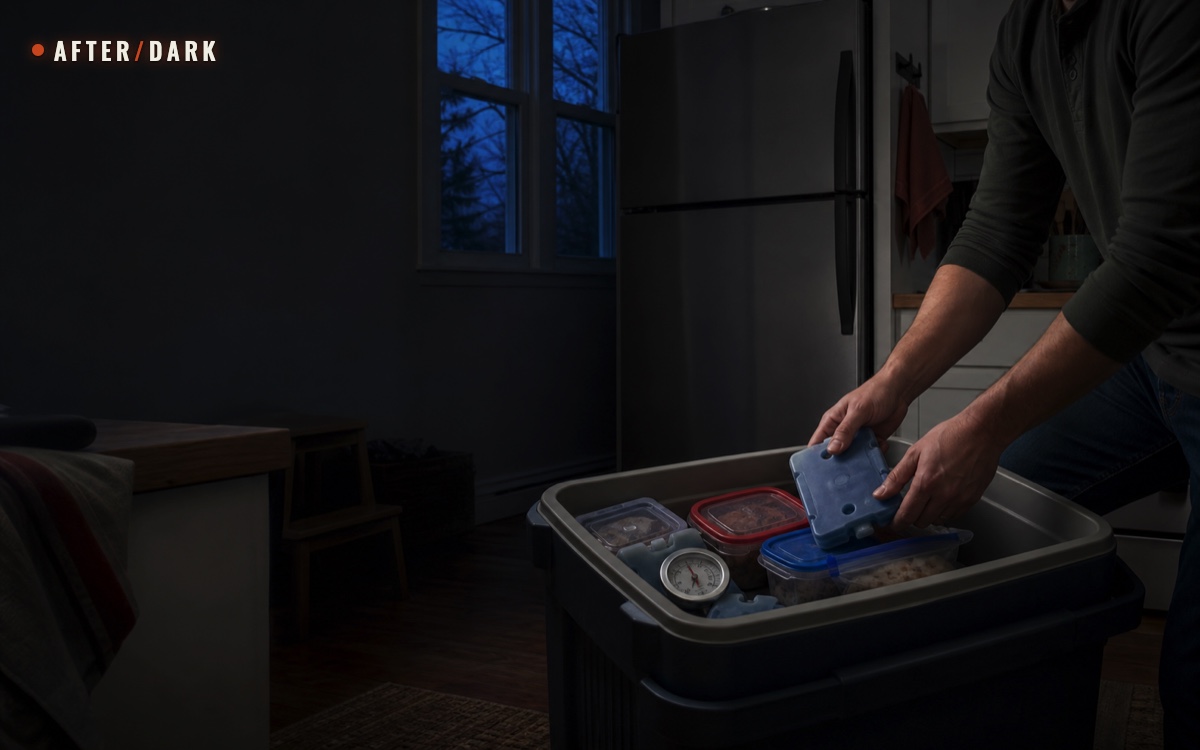
Short answer
Key takeaways
- Start one written outage clock and keep refrigerator and freezer doors closed; repeated checking spends the cold you are trying to preserve.
- Plan around the official closed-door windows: up to four hours for a refrigerator, about 48 hours for a full freezer, and 24 hours for a half-full freezer.
- A cooler extends the refrigerator plan only when enough ice or frozen gel packs keep its contents at 40°F (4°C) or below.
- Use temperature, ice-crystal condition, elapsed time, and the current FoodSafety.gov chart to evaluate food; never taste it as a safety test.
- Keep refrigeration energy separate from the reserve for phones, lights, and radios, and rely only on a fully compatible, measured backup-power setup.
To keep food cold during a power outage, leave refrigerator and freezer doors closed, record when power failed, and use appliance thermometers. A closed refrigerator keeps food safe for up to four hours; a full freezer for about 48 hours, or 24 hours when half-full. If the refrigerator reaches four hours and power is still off, move selected perishable food to a prepared cooler with enough ice or frozen gel packs to hold 40°F (4°C) or below. Afterward, evaluate food by temperature and current official charts—never by tasting it.
This guide builds the cold-storage system: what to prepare, which clock applies to each appliance, when a cooler becomes useful, how to document temperatures, and how to decide what remains usable when power returns. It does not cover recipes or heating methods; use the separate outage cooking plan after a food item passes the cold-storage decision.
A long outage eventually outlasts every passive cold source. The objective is not to promise indefinite refrigeration. It is to preserve the available cold deliberately, protect the most temperature-sensitive food while verified capacity exists, and make discard decisions from evidence rather than memory.
Build a Three-Layer Cold Plan
Treat the refrigerator, freezer, and insulated cooler as different layers. They do not have the same starting temperature, useful window, or operating rule.
Cold-Storage Map: assign every layer a job before an outage.
| Layer | Primary job | Evidence that controls the decision | Main operating rule |
|---|---|---|---|
| Refrigerator | Hold food that is currently in routine use | Outage start time and appliance temperature | Keep closed; prepare for a controlled transfer if the outage reaches four hours |
| Freezer | Preserve the longest passive cold reserve | Full or half-full status, outage time, temperature, and ice crystals | Keep closed and grouped; do not spend its longer window on repeated checks |
| Insulated cooler | Extend cold storage for selected refrigerated perishables | Cooler thermometer and available ice or frozen gel packs | Open briefly, monitor at 40°F (4°C) or below, and replenish the cold source before the limit is crossed |
| Shelf-stable reserve | Replace meals that no longer have verified cold storage | Package label and household inventory | Use the 30-day food and water plan rather than trying to save every refrigerated item |
The layers work in sequence, not as interchangeable boxes. A room-temperature empty cooler is not a cold source. A freezer is not a convenient place to browse during an outage. A refrigerator does not become safe again merely because its light turns on when power returns.
Create one cold-storage sheet with these fields:
- outage start time and how it was established;
- refrigerator and freezer temperature before the outage, when known;
- whether the freezer was full or half-full;
- exact locations of appliance thermometers;
- cooler size, thermometer, cold-source inventory, and storage location;
- the refrigerated items selected for possible transfer;
- the person responsible for the clock and temperature log;
- the current official food-safety chart in print or saved offline.
Put this sheet with the household plan, not inside the refrigerator. Assigning one person to the log prevents several people from opening doors to answer the same question.
Prepare the Appliances Before an Outage
CDC recommends appliance thermometers in both the refrigerator and freezer. The refrigerator should normally be at 40°F (4°C) or below and the freezer at 0°F (-18°C) or below. USDA explains that an internal appliance thermometer provides cold-storage evidence during an outage. An exterior display can also be useful, but confirm what the appliance manufacturer says it measures.
Set up each appliance as an operating system:
- Install and read the thermometers. Put them where the manufacturer recommends and confirm they are readable without searching through food.
- Record normal temperatures. Check several ordinary days so the household recognizes its normal range before an emergency.
- Group freezer food. FDA says grouped frozen food stays cold longer. Keep the items organized enough that one deliberate retrieval does not become a long search.
- Freeze water containers and gel packs. Use clean containers intended for food or drink, leave the expansion space their manufacturer requires, and keep them frozen as thermal mass and future cooler cold sources.
- Identify the freezer's normal fill level. Record whether it is generally full or about half-full; that changes the official planning window.
- Check door seals and closure. If a door does not close normally, address it as appliance maintenance before relying on the published closed-door window.
- Photograph or list the contents. An external inventory lets the household choose an item without standing in front of an open door.
Do not pack an appliance so tightly that vents, drawers, sensors, or the manufacturer's required airflow are blocked. More thermal mass is useful only inside the appliance's normal operating instructions.
Prepare a Cooler That Can Be Measured
CDC advises having a cooler and frozen gel packs ready in case refrigerated food must be moved. The cooler becomes a real storage layer only after a household confirms that it can stay at 40°F (4°C) or below.
Assemble the cooler kit in one accessible location:
- a clean insulated cooler with a working lid and intact seal;
- an appliance thermometer suitable for cold storage;
- frozen gel packs, frozen water containers, or a planned source of ordinary or block ice;
- leak-resistant food containers or sealed packages;
- clean towels for ordinary condensation and meltwater outside food packages;
- the temperature log and a pen;
- a second small cooler for drinks, if available.
The second cooler is an After/Dark operating preference, not an official requirement. It protects the food cooler from repeated opening when someone wants water or another frequently used item.
Choose where each cooler will sit. Use a cool indoor location away from direct sun, heat-producing appliances, and busy routes. Keep it where the thermometer can be checked quickly and where meltwater cannot damage electrical equipment or block movement. Integrate that location with the zones in the prepared home-base plan.
Record where ordinary or block ice is normally available, but do not count a store as guaranteed outage capacity. Roads, payment systems, store power, and local stock can fail together. Frozen gel packs and water containers already in the home create the first independent layer.
Start One Outage Clock
When power fails, write down the earliest reliable time. Use a utility alert, a household observation, an appliance notification, or another documented signal. If nobody knows when the outage began, record that uncertainty rather than inventing a precise start.
Then take these actions without opening the appliances:
- Confirm that the refrigerator and freezer doors are fully closed.
- Tell the household that one person controls cold-storage access.
- Place a note on each door with the outage start time and
KEEP CLOSED. - Retrieve the external inventory and select the items that would move to the cooler if needed.
- Stage the closed cooler, thermometer, cold sources, containers, and log nearby.
- Check the utility estimate and official local instructions without treating an estimate as a guarantee.
- Switch planned meals to the shelf-stable layer so nobody opens a door from habit.
CDC states that food stays safe for up to four hours in an unopened refrigerator, about 48 hours in a full unopened freezer, and 24 hours in a half-full unopened freezer. Those figures are planning windows under the stated closed-door conditions. They are not guaranteed runtimes for every appliance, room temperature, prior door opening, or unknown outage.
Outage Clock: protect the longest available cold window.
| Elapsed time | Refrigerator action | Freezer action | Cooler action |
|---|---|---|---|
| 0–4 hours | Keep closed; use the external inventory | Keep closed | Stage the empty cooler and cold sources without opening either appliance |
| At about 4 hours, if power remains off | Make one controlled transfer of selected refrigerated perishables only when the cooler can stay at 40°F (4°C) or below | Keep closed | Pack, close, start the cooler temperature log |
| 4–24 hours | Treat the refrigerator as unavailable unless a verified cold source keeps it at 40°F (4°C) or below | Preserve the closed-door reserve | Check briefly on a written schedule; replenish ordinary ice or frozen gel packs as required |
| 24–48 hours | Use only food still held within official limits | A half-full freezer has reached its planning window; a full freezer may retain its window to about 48 hours | Continue only while measured at 40°F (4°C) or below |
| When power returns | Evaluate item by item before returning food | Check temperature and ice crystals before refreezing decisions | Record the last temperature and evaluate every item |
If a door was opened repeatedly, the appliance started warm, the seal is poor, or the outage start is unknown, do not pretend the full planning window still applies. Temperature and current official guidance become the controlling evidence.
Use the Refrigerator Window Deliberately
The refrigerator has the shortest passive window. Do not spend it deciding what is inside. Use the external inventory and stage the cooler first.
CDC advises that, once power has been out for four hours, refrigerated perishable food should be moved to a cooler when ice or frozen gel packs are available to keep it at 40°F (4°C) or below. That creates a clear transfer trigger:
Transfer only when the outage is continuing, the cooler is ready, sufficient cold sources are present, and the thermometer can verify the result.
Prioritize the refrigerated items that the current FoodSafety.gov outage chart treats as perishable, including meat, poultry, seafood, milk, eggs, leftovers, cooked foods, soft cheeses, and cut fruits or vegetables. Do not use this short list as a substitute for the item-level chart; specific products and conditions differ.
Some foods in a refrigerator may not require the limited cooler space. The official chart distinguishes, for example, between many perishable foods and items such as uncut produce, butter, hard cheeses, breads, peanut butter, and several condiments. Make that decision from the current chart, not from a household rule that everything in the refrigerator is equally vulnerable.
Plan one controlled opening:
- Put the cooler beside the refrigerator and arrange cold sources before opening the door.
- Have the written priority list and containers ready.
- Remove only the selected items in one short sequence.
- Close the refrigerator immediately.
- Pack and close the cooler.
- Record the transfer time and first stable cooler temperature.
If the cooler cannot hold 40°F (4°C) or below, moving food into it does not extend safe cold storage. Shift the household to shelf-stable meals and use the official chart for discard decisions.
Protect the Freezer Reserve
The freezer is usually the longest passive cold layer, so unnecessary access has a larger opportunity cost. Keep it closed while the refrigerator-to-cooler transfer takes place.
A full freezer holds its temperature for about 48 hours and a half-full freezer for about 24 hours when the door remains closed, according to FDA outage guidance. These times help schedule decisions; food temperature and condition still determine what happens next.
Do not automatically move frozen food into a refrigerator cooler. A small cooler with limited ordinary ice may offer less cold time than a closed, grouped freezer. Transfer frozen food only into another verified freezing or cold-storage layer that can maintain the required condition, and only when the plan shows a material benefit.
When power returns, FoodSafety.gov says frozen food may be safely refrozen when it still contains ice crystals or is at 40°F (4°C) or below, although quality may decline. Evaluate each package. The chart gives different outcomes for different foods; one freezer-wide verdict is not reliable.
Do not move food outdoors because the weather feels cold. USDA explains that outdoor temperatures can change by the hour, sunlight can thaw frozen food, and exposed food can encounter unsanitary conditions or animals. A monitored appliance or insulated cooler is a controlled layer; a porch, balcony, vehicle, or snowbank is not.
Pack and Monitor the Cooler
The cooler needs cold food, sufficient cold sources, little empty warm air, a working thermometer, and disciplined access. Prepare all five conditions rather than trusting the cooler's marketing description.
Cooler Packing Sequence: turn an empty insulated box into measurable cold storage.
| Step | Action | Passing evidence |
|---|---|---|
| 1. Pre-stage | Put cold sources, thermometer, containers, and log beside the cooler | Nothing requires a second refrigerator opening |
| 2. Add a cold base | Place frozen gel packs, frozen water containers, or ordinary ice in the cooler | The bottom layer is cold before food enters |
| 3. Load selected food | Keep packages sealed or place them in clean leak-resistant containers | Food is protected from meltwater and cross-contact |
| 4. Surround with cold | Fill gaps and cover the upper layer with the remaining cold sources | Cold is distributed rather than isolated in one corner |
| 5. Place the thermometer | Follow its manufacturer instructions in a representative location | The reading can be checked quickly |
| 6. Close and log | Close the lid and record transfer time | One written record starts before the next opening |
Keep the cooler at 40°F (4°C) or below. Check it on a written schedule and open it only long enough to read the thermometer, remove a planned item, or replenish the cold source. Record every opening, temperature, and addition of ordinary ice or frozen packs.
If available ice must be rationed, protect one smaller food cooler rather than creating several partly cold containers that cannot be verified. Do not add room-temperature groceries to the protected cooler without accounting for the heat they introduce.
Meltwater is not proof that the food became unsafe, and solid ice is not proof that every package stayed within limits. Use the thermometer, elapsed-time log, package condition, and official chart together. Discard leaking, damaged, or contaminated food according to current official instructions.
Decide Whether Backup Power Belongs in the Plan
Backup power can extend refrigeration only when the complete system is compatible and its useful energy has been measured. A large capacity number alone does not show that a source can start or continuously run a particular appliance.
Record these values from the actual equipment and manufacturer documentation:
- refrigerator or freezer continuous input and any stated starting requirement;
- backup source continuous and surge output;
- permitted outlet, connector, cable, and operating environment;
- verified usable energy reserved for refrigeration in watt-hours;
- measured refrigerator energy over a representative normal day;
- recharge method and whether it remains available during the same outage;
- automatic shutdowns, temperature changes, or alarms observed during a normal test.
Use measured daily energy for the planning estimate:
Estimated supported days = verified usable refrigeration energy (Wh) ÷ measured appliance energy per day (Wh)
If 1,200 Wh is verified and reserved for refrigeration, and the appliance uses 800 Wh during a measured representative day, the editorial estimate is:
1,200 ÷ 800 = 1.5 similar days
This calculation is not a runtime promise. Ambient temperature, door use, compressor cycling, appliance condition, conversion losses, and source protection behavior can change the result. The source must also meet every output and connection requirement before stored energy matters.
Do not improvise wiring, bypass a protection feature, backfeed household circuits, or create a fixed electrical connection. Any setup requiring installed transfer equipment or electrical work belongs with a qualified local professional and current code. Follow every appliance and power-source instruction.
Keep this capacity separate from the phones, lights, and radios plan. If both plans count the same stored energy, neither budget is real. Even with verified backup power, retain the cooler, cold sources, shelf-stable meals, and outage clock; a single powered appliance should not be the only layer.
Recover Food Item by Item
Power restoration ends the outage clock, but it does not automatically reset food safety. Before reorganizing the appliances, record the restoration time and read every thermometer.
Use this recovery sequence:
- Record the refrigerator, freezer, and cooler temperatures before prolonged door opening.
- Preserve the written outage start time, access history, and cold-source additions.
- Separate refrigerated, frozen, cooler-held, and shelf-stable items.
- Check each food type against the current FoodSafety.gov power-outage chart.
- For frozen food, record whether ice crystals remain and whether the food is at 40°F (4°C) or below.
- Discard items when the official chart requires it or when time and temperature cannot be established conservatively.
- Clean and reset the refrigerator, freezer, cooler, thermometers, and log after the decisions are complete.
Never taste food to determine whether it is safe. CDC notes that unsafe food can look and smell normal. Cooking also does not reverse an earlier period outside official limits.
Recovery Ledger: one row per item or identical batch.
| Field | Example of evidence | Why it matters |
|---|---|---|
| Item and package | Exact product, sealed or opened | Official outcomes differ by food type and condition |
| Original layer | Refrigerator, freezer, or cooler | Identifies the applicable clock and temperature record |
| Outage duration | Start and restoration timestamps | Establishes the exposure window |
| Highest known temperature | Appliance or cooler thermometer | Replaces guessing from room temperature |
| Frozen condition | Ice crystals present or absent | Supports the official frozen-food decision |
| Official chart result | Keep, refreeze, or discard | Creates a traceable decision |
| Final action and time | Recorded immediately | Prevents a rejected item from returning to storage |
Do not write one verdict for an entire refrigerator or freezer unless every item genuinely shares the same food category, temperature history, and chart outcome.
Keep a Temperature and Access Log
A short log makes uncertainty visible. It should be usable by another household member without an app or internet connection.
Cold-Storage Log: record changes, not constant door openings.
| Time | Layer | Temperature | Door or lid opened? | Cold source added | Action and reason |
|---|---|---|---|---|---|
| Outage start | Refrigerator | Last known reading | No | None | Door marked closed |
| Outage start | Freezer | Last known reading | No | None | Full or half-full status recorded |
| Transfer | Cooler | First stable reading | Yes, once | Type and amount recorded | Selected refrigerated food moved |
| Scheduled check | Cooler | Current reading | Briefly | Addition recorded | Continue or begin item-level evaluation |
| Power return | All layers | Final readings | Controlled | None | Recovery ledger started |
The log does not justify opening a refrigerator or freezer merely to collect a number. If the thermometer cannot be read externally, preserve the closed-door window and take a reading during the one planned access or at restoration.
Save the official chart offline and keep a printed copy with the log. Recheck the online version during routine maintenance because guidance pages and individual chart entries can change.
Run a No-Risk Cold-Storage Test
Test the cooler and household workflow on an ordinary day while utilities are available. Do not switch off a loaded refrigerator or freezer, risk food that requires refrigeration, or interfere with normal appliance safety features.
- Choose safe test contents. Use chilled sealed water containers or other nonperishable ballast instead of food that could become unsafe.
- Pre-chill the cooler contents normally. Freeze gel packs or water containers in the functioning freezer.
- Stage the transfer. Put the empty cooler, cold sources, thermometer, log, and test contents in their planned locations.
- Pack once. Follow the same sequence the household would use at the four-hour trigger.
- Place the cooler in its planned outage location. Keep normal room conditions and record the starting temperature.
- Follow the access schedule. Open only at the planned checks and record temperature, duration, and cold-source changes.
- Stop at the boundary. End the test before the cooler rises above 40°F (4°C); do not treat crossing the limit as a goal.
- Calculate verified hold time. Use the last reading at or below 40°F (4°C), not the manufacturer's headline claim.
- Reset the kit. Clean and dry the cooler according to its instructions, refreeze reusable cold sources, and correct the inventory.
Cooler Test Result: convert observations into a usable household limit.
| Test field | Record |
|---|---|
| Cooler and usable volume | Exact model or description; measured usable space |
| Test contents | Number and size of chilled sealed containers |
| Cold sources | Type, number, size, and starting condition |
| Room conditions | Approximate temperature and cooler location |
| Openings | Time, duration, and reason |
| Temperature sequence | Every scheduled reading |
| Verified hold time | Last recorded time at 40°F (4°C) or below |
| Required correction | More cold sources, smaller protected volume, fewer openings, or different placement |
A passing test does not guarantee the same duration in hotter weather, with warmer food, a different ice supply, or more frequent access. Repeat the test when the cooler, cold sources, location, household use, or season changes materially.
Fix the Common Failure Modes
Nobody recorded when the outage began
Use the earliest reliable utility or household evidence and record the uncertainty. Do not claim the full planning window when part of it may already have elapsed.
Everyone checks the refrigerator
Assign one cold-storage lead, post the start time on the door, and use the external inventory. Curiosity is an unplanned door opening.
The cooler is ready but not cold
An empty insulated box does not generate cold. Add sufficient frozen gel packs, frozen water containers, ordinary ice, or block ice and verify 40°F (4°C) or below with a thermometer.
Everything is transferred
Use the official item-level chart and the written priority list. Protect the limited cooler space for food that actually requires controlled cold storage.
Frozen food is moved too early
Preserve the closed freezer's longer window unless another verified layer offers a clear advantage. One hurried transfer can warm the entire reserve.
Food is judged by smell
Use time, temperature, ice crystals, handling history, and the current official chart. Never taste food as a test.
One battery is promised to every system
Create separate energy allocations for refrigeration and for communication or lighting. Capacity counted twice is not redundancy.
Cold storage is the entire food plan
Maintain a familiar shelf-stable reserve that works after ice and stored energy are exhausted. The freezer is a temporary resource, not the foundation of a long disruption.
Maintain the Cold Plan
After/Dark recommends checking the cold-storage inventory every three months and repeating the cooler test every six months or before the highest local outage-risk season. These are editorial maintenance intervals; appliance manuals, product instructions, and official local guidance take priority.
At each review:
- read both appliance thermometers and compare them with the normal log;
- confirm cooler seals, cleanliness, thermometer operation, and storage location;
- refreeze gel packs and water containers after normal use;
- update the external refrigerator and freezer inventory;
- verify the ordinary or block-ice sourcing note without counting retail supply as guaranteed;
- inspect approved cables and backup-power equipment according to manufacturer instructions;
- measure refrigerator energy again if the appliance, settings, location, or household use changed;
- download or print the current official outage chart;
- rotate shelf-stable meals through normal use and replace what was consumed;
- rerun any layer that failed its last test.
After a real outage, replace used cold sources, clean and dry the cooler, update the recovery ledger, and record what shortened the verified window. A good post-outage review changes the plan while the evidence is still available.
Zombie Scenario: The Last Closed Door
Fictional scenario
In this fictional outbreak, the grid fails just after sunset and the utility estimate disappears with the mobile signal. The freezer is full, both appliance thermometers were already in place, and the household writes the start time on the kitchen plan. Nobody opens a cold-storage door during the first four hours; dinner comes from the shelf-stable reserve.
When the refrigerator window ends and power is still absent, one person stages the tested cooler while another reads the external inventory. They make one short transfer of the selected refrigerated perishables, surround the sealed containers with frozen packs, close the lid, and start the temperature log. The freezer remains untouched.
The next day, the cooler is still within its verified range, the household knows exactly when it was opened, and the small-device battery reserve has not been consumed by an untested appliance. The fictional pressure is extreme, but every useful action is ordinary: protect the closed door, measure the cold you still have, and switch to shelf-stable food before evidence runs out.
Frequently Asked
Is refrigerated food automatically unsafe after four hours without power?
Should I move food into a cooler as soon as the power goes out?
Can I keep refrigerated or frozen food outside in cold weather?
How much ice does a cooler need during an outage?
Can a portable power station run a refrigerator?
Sources
- CDC — Keep Food Safe After a Disaster or Emergency
- U.S. Food and Drug Administration — Food and Water Safety During Power Outages and Floods
- FoodSafety.gov — Food Safety During Power Outage
- USDA Food Safety and Inspection Service — Refrigeration & Food Safety
- USDA Food Safety and Inspection Service — Freezing and Food Safety
Related guides
How to Cook Without Electricity During a Long Outage
Build an outage kitchen for an apartment or house with no-cook meals, safe heat options, measured capacity, and clear food-safety limits.
How to Build a 30-Day Food and Water Supply for an Apocalypse
A practical 30-day pantry for apocalypse preparedness, built from person-days, package labels, a no-cook layer, and stored water you can rotate.
How to Keep Phones, Lights, and Radios Powered During a Long Outage
Build a small-device power system around measured demand, compatible charging chains, distributed lighting, and a written no-outlet test.